How to Frontend: Rendering the Virtual DOM
This series of posts focuses around how modern frontend view libraries work.
This is a lengthier post so here’s a table of contents:
Rendering the Virtual DOM
Now that we’ve found a good way to build up the virtual DOM, it’s time to render it to the real DOM!
Traversing and Rendering the Virtual Tree
Let’s walk through what we need to do to take our virtual tree and render it onto a browser.
Here’s the general strategy of our render function:
- Render the root node
- If it’s an Element, call
Document#createElement - If it’s Text, call
Document#createTextNode
- If it’s an Element, call
- Apply the virtual props to the rendered root node
- Iterate through the virtual nodes children and:
- Render those children
- Append the child to the root node
- Return the root node
This is basically a modified depth-first pre-order tree traversal.
Take a look at the code snippet:
/**
 * Creates a DOM node from a virtual node
 *
 * @param  {Object|string} vNode A virtual node or virtual text node
 * @return {Node}          node  An actual DOM node
 */
const render = vNode => {
    // Create a text node if we're given a string
    if (typeof vNode === 'string') {
        return document.createTextNode(vNode);
    }

    // Create an element if we're given a vNode object
    const node = document.createElement(vNode.tagName);

    /*
     * Apply the virtual props to the actual node
     *
     * More on this in the next section
     */
    applyProps(node, vNode.props);

    vNode.children
        // Recursively render the virtual children
        .map(render)
        // And attach them to the DOM node
        .forEach(childNode => {
            node.appendChild(childNode)
        });

    // Return the DOM node
    return node;
};
Applying Props
A key step in the algorithm we outlined above is applying props from the virtual node to the actual node.
There are a few different cases of props that we need to consider:
- Props as primitives
<div id="3" /> <input type="text" /> - Props as objects
<!-- https://developer.mozilla.org/en-US/docs/Web/API/HTMLElement/dataset --> <div data-hello=":)" data-goodbye=":(" /> <!-- https://developer.mozilla.org/en-US/docs/Web/API/HTMLElement/style --> <div style="height: 0; width: 0;" /> - Props as functions
button.addEventListener('click', () => console.log('clicked!'));
Here’s how we handle those cases:
/**
 * Apply the virtual props to the actual DOM node
 *
 * @param {Element} node
 * @param {Object}
 */
const applyProps = (node, props) => {
    // Iterate through all the props
    Object.keys(props)
        .forEach(propName => {
            const prop = props[propName];

            /*
             *The prop is if the prop is a primitive
             *
             * Example:
             *   {id: 3}
             *   <someElement id="3" />
             */
            if (typeof prop === 'string' || typeof prop === 'number') {
                // Assign the prop to the node with the namespace [propName]
                node[propName] = prop;

            /*
             * This is if the prop is another object containing more properties
             *
             * Example:
             *   Could have a style prop: { margin: 'auto', backgroundColor: '#fff' }
             *   <someElement style="margin: auto, background-color: #fff" />
             */
            } else if (typeof prop === 'object') {
                Object.keys(prop)
                    .forEach(attributeName => {
                        // Assign the prop to the node with the extended namespace [propName][attributeName]
                        node[propName][attributeName] = prop[attributeName];
                    });
            /*
             * This is if ithe props is a function
             *
             * We use the same on* naming convention as React but this could check for on-*, like in Vue
             *
             * NOTE:
             * Instead of attaching event handlers directly to the node, we make have event listeners
             * at the document level listening to events and delegating them specific nodes
             *
             * More on this in the next section
             */
            } else if (propName.substring(0, 2) === 'on' && typeof prop === 'function') {
                const eventType = propName.substring(2).toLowerCase();
                EventDelegator.registerHandler(node, eventType, prop);
            }
        });
};
Managing Events
You might wonder why we use an EventDelegator instead of directly assigning the function to the node.
div.onclick = event => console.log('clicked');
The above works, so, why?
1. It’s old
That style of event binding is fairly antiquated. See EventTarget#addEventListener.
2. EventDelegator can handle browser specific implementations
For example, IE 6 through 10 uses the non-standard method EventTarget#attachEvent instead of EventTarget#addEventListener.
EventDelegator abstracts away these details.
3. EventDelegator decouples the event definition from the DOM to the event listeners
By decoupling the event definition from the listener, we can prevent mutations of the events and normalize events.
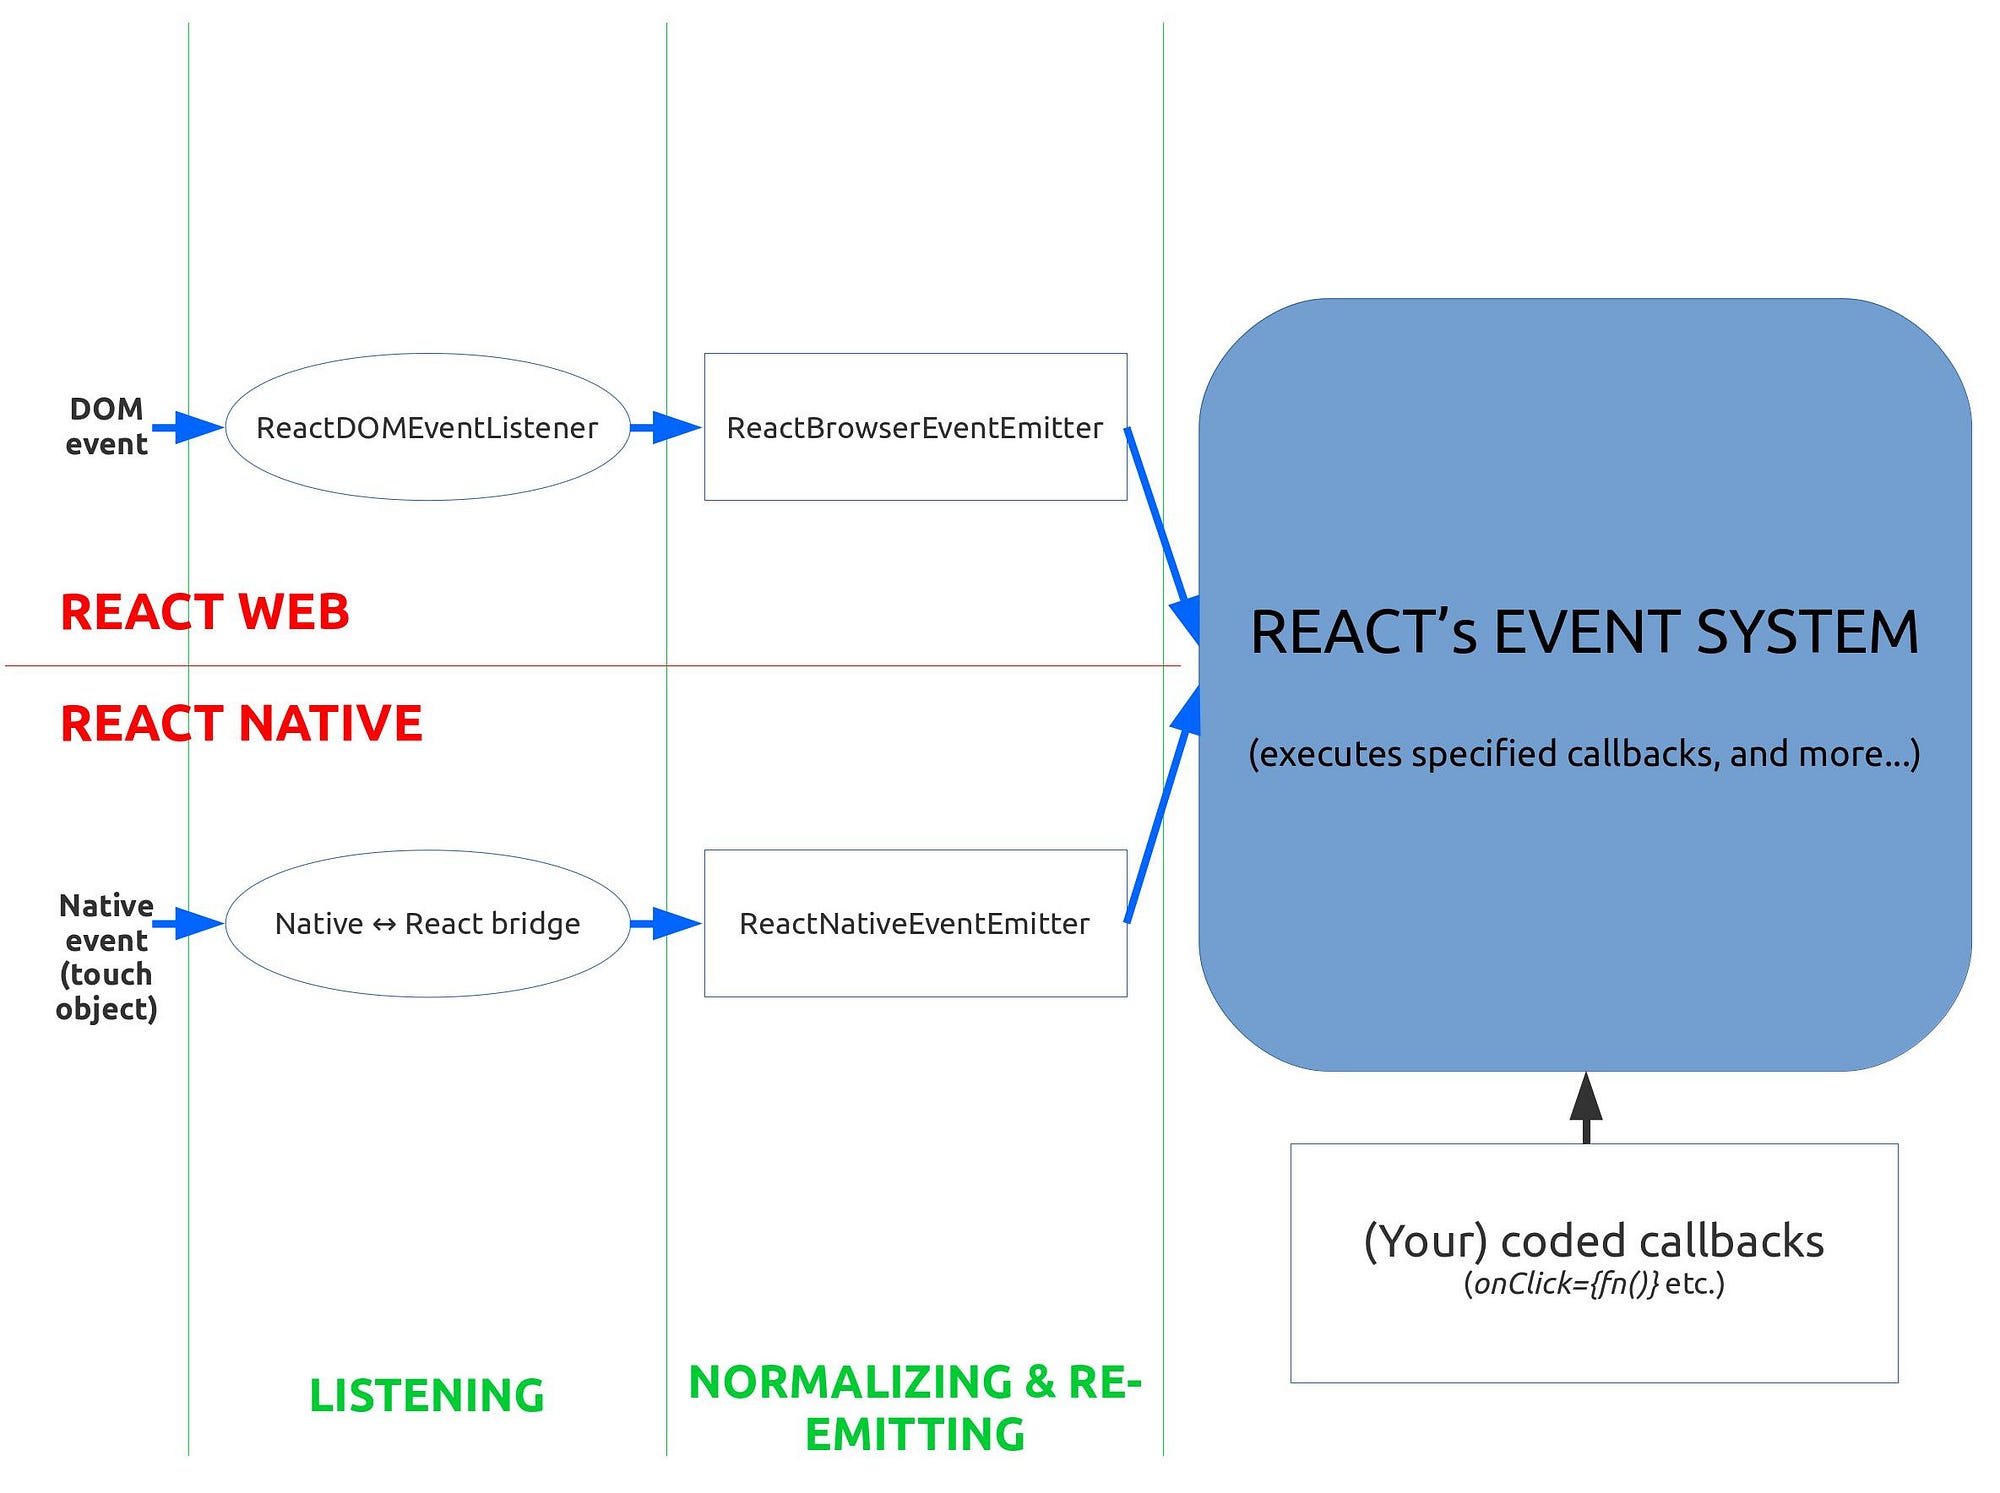
This idea of event normalization is the basis of React’s synthetic event system possible.
Instead of reading events directly from the DOM, React processes the native DOM event and then forwards the event to the React synthetic event system. This process means React event system is platform agnostic.
Want to run React on mobile? Just normalize the events so that the internal even system can handle it!
 Read more about React’s event system here
Fun Fact This event normalization can also be found in Vue, which supports web and Weex. It is notably left out of Preact to give a performance improvement.
Now, here’s my example snippet (which does not normalize events):
/**
 * EventDelegator is a document level event listener that to listens to events for the entire app
 * and invokes a handler on behalf of a targeted node
 */
const EventDelegator = {
  /**
   * Unique key/namespace for us to store event handlers
   *
   * Example:
   *   const div = document.createElement('input'); // Gives us a <input />
   *   input.EVENT_MANAGER_KEY = {};
   *   input.EVENT_MANAGER_KEY.change = (event) => { console.log(event.target.value); }
   *
   * @var {string}
   */
  key: 'EVENT_MANAGER_KEY',

  /**
   * Use this as a Set to know what event types have been registered
   *
   * Basically, we don't want to register an event type more than once because then we'd
   * invoke handlers multiple times
   */
  eventTypes: {},

  /**
   * Register event types for the EventDelegator to listen to and manage
   *
   * @param {string[]} eventTypes
   */
  registerEventTypes: (eventTypes) => {
      eventTypes.forEach(eventType => {
          if (EventDelegator.eventTypes[eventType]) {
              return;
          }

          // Register the event type
          EventDelegator.eventTypes[eventType] = true;

          // Assign a global listener to that event type
          document.addEventListener(eventType, event => {
              // Look at the targeted node and try to invoke its event handler
              EventDelegator.invokeHandler(event.target, eventType, event);
          });
      });
  },

  /**
   * Registers an event handler for a specific node
   *
   * @param {Node}   node
   * @param {string} eventType
   * @param {Event}  event
   */
  registerHandler: (node, eventType, handler) => {
      if (!node[EventDelegator.key]) {
          node[EventDelegator.key] = {};
      }

      // Only one handler per event type
      node[EventDelegator.key][eventType] = handler;
  },

  /**
   * Invokes an event handlers registered to a node, if the node has any event handlers
   *
   * @param {Node}   node
   * @param {string} eventType
   * @param {Event}  event
   */
  invokeHandler: (node, eventType, event) => {
      // No operation if there is no handler tied to the node
      if (!node[EventDelegator.key] || !node[EventDelegator.key][eventType]) {
          return;
      }

      /*
       * Otherwise, invoke the handler
       *
       * Note: Instead of passing the event back in here, we could create a SyntheticEvent
       * instead and pass that in instead
       */
      node[EventDelegator.key][eventType](event);
  },
};
Mounting Nodes
Now that we’ve defined all parts of the render function, all that’s left is to mount the rendered node to the DOM.
We can do so by using the following methods:
Node#appendChild- For the first render
Node#replaceChild- For subsequent renders
/**
 * Renders a virtual node and mounts it to a real node so that it shows up in the browser
 *
 * @param  {Node}   node
 * @param  {Object} vNode
 */
const mount = (root, vNode) => {
    const node = render(vNode);
    console.log(node);

    // The app has already mounted once, so replace the old app with the new app
    if (root.childNodes.length) {
        root.replaceChild(node, root.childNodes[0]);

    // First render
    } else {
        root.appendChild(node);
    }

    return node;
};
Functional UIs
And now, let’s take our Todo App example from the previous posts and make a small change.
Instead of assigning TodoApp to some static virtual tree, let’s make it a function of some data:
const TodoApp = (data) => createVNode('div', { className: 'container' },
    createVNode('h1', {}, 'Todo App'),
    createVNode('div', { className: 'form-group' },
        // Wow, value is set to data.input
        createVNode('input', { className: 'form-control', type: 'text', placeholder: 'Do laundry', value: data.input, onKeyUp: onInputKeyUp }),
        createVNode('br', {}),
        createVNode('button', { className: 'btn btn-primary', onClick: onButtonClick }, 'Add Todo')
    ),
    createVNode('h2', {}, 'Things to do:'),
    createVNode('ul', { className: 'list-group' },
        // :O the todo items are generated by mapping over data.todos
        ...data.todos.map(todoString => createVNode('li', { className: 'list-group-item' }, todoString))
    )
);
What we’ve done here is very simple but quite powerful. In essence, we’ve stated:
UI = F(data)
By making our UIs functional, we are able to decouple our data manipulation from our views.
What that means is our UI’s only concern is with presenting data. It doesn’t make any decisions about how to update the data; it only accepts data and returns a view.
Looking at our TodoApp, we achieve this separation by accepting an onClick props on the <button /> and an onKeyUp on the <input />. The UI doesn’t care what those props are, all it does is execute.
See the Pen Virtual DOM Example 3 by Walter Tan (@waltertan12) on CodePen.
Shortfalls
That example is kind of awesome, right?
However, if you’ve tried using it at all, you probably noticed some pretty obvious issues.
- The input field loses focus every time you type into it
- The application gets slower and slower with every added item
These problems are both associated with the fact that we are re-rendering the entire DOM tree on every single change.
Type into the input field?
The app re-renders and the input field with focus on is replaced with a new input field without focus.
Have 300 items in your todo list?
The browser has to recalculate all the positions of the elements and repaint them onto the screen.

We’ll explore some ways to overcome this problem in the next post.
Walter